Pages

Showing posts with label Papertrey Ink. Show all posts

Tuesday, July 29, 2014

Diamond Wallpaper Stamping

Papertrey Ink has a tutorial about making your own background using stamps for Make It Monday #174.  It looked cool so I decided to try it out.  My first couple of tries were duds!  I was rushing things so the diamonds were super crooked.  I was more careful with this one and I am pretty happy with how it turned out. I popped up the Chrysler Building, which is my favorite building in NYC.  I love that Art Deco look.

All the stamps used are from City Scene by Papertrey Ink,  which I was happy to finally use!  Oh, except the sentiment.   That's from their Road Trip stamp set.

My husband and I live near the NYC so I am going to use this card to ask him out on a date.  Of course, he will say yes ;-)

Friday, April 4, 2014

Froggy Baby Card


I made this CAS card for a co-worker who is going to have a baby.  I am so happy for her and her hubby.


I kept the card very simple - die cut, embossing, one stamp, and some baker's twine.  Oh, and I tried out Wink of Stella on the froggy's spots.  That stuff is great - very sparkly!  The little frog is from the Tiny Treasures Cricut cartridge and I cut him at 2 in.  The stamp is from Papertrey Ink and the embossing folder is from Stampin Up.  It love the random spots all over - it's fun pattern.  I am thinking it could be used as background for snow if you make a winter card, too.

I would like to enter this card in:
Alphabet Challenge Blog for D is for Diecuts


"When green is all there is to be 
It could make you wonder why
But why wonder, why wonder?
I am green and it'll do fine
It's beautiful and I think it's what I want to be"

-- Kermit the Frog

Sunday, March 2, 2014

Watercolor Backgrounds

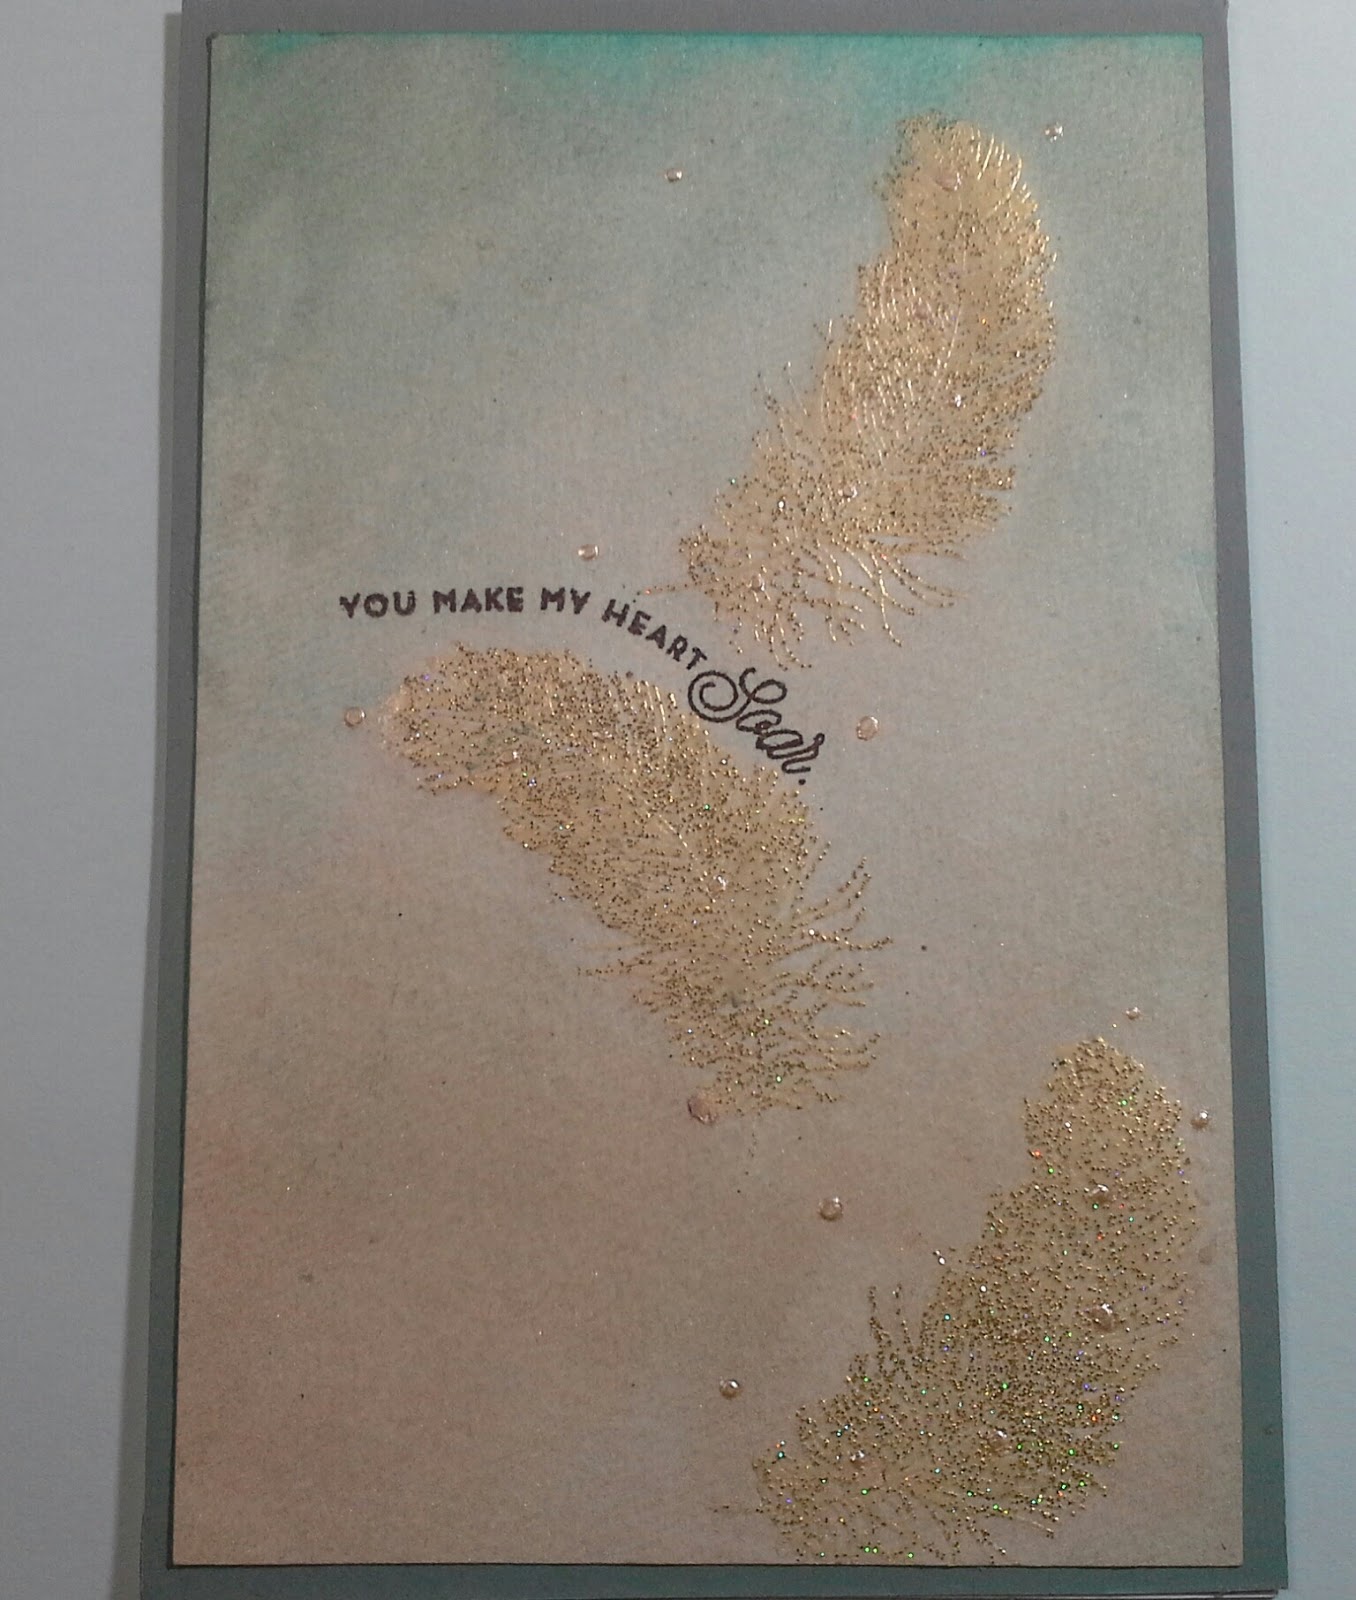
I sthis post on the Papertrey Ink bl watercolor backgrounds and decided to give it a try.  It is such a pretty and soft look for backgrounds.  Dawn McVey shows two different ways to do this with heat embossed images.  I tried out the first by heat embossing and then brushing on the color.

At first, it  looked like a big ole mess.  I got a little too happy splashing colors and had pools of color all over!  Trust me - it was  not pretty.  Thankfully, this technique is really forgiving  I had to blot out quite a bit and then I went over it again with a flat brush.

Next time, I will try out the second way - to do the background and then heat emboss.  I had gotten some saturated color where the images had spaces and it was tough to soften.  Doing the background first will make it more uniform.

I decide to enter this in Craft Creations Challenges - Challenge 257, Keep It Simple, Simon Says Challenge - Anything Goes with Pearls,  and  Virginia's View Challenge #1: Watercoloring.
.


Materials:

Papertrey Ink
  • Feather Finery Stamp Set
  • Smokey Shadow Dye Ink
  • Ocean Tides cardstock
Ranger
  • Peacock Feathers Distress Stain
  • Bisque Liquid Pearls
Lindy's Stamp Gang
  • Moonshadows in Gold Doubloons and Buccaneer Bay Blue 

Saturday, February 8, 2014

Valentine Blog Hop 2014 - Butterfly Pops

Hello from snowy Jersey!  Welcome to our 2014 Valentine's Day Blog Hop! You should have reached from cricutaddicted's blog, ScrappingForMoreFun.  If you are just joining up, please start at RockinRenee's blog.

I was looking for ideas on Pinterest and inspired by Skip to My Lou to make Butterfly Valentine Pops  The moment I saw the pic I thought: Hey, I can make those with my Cricut!  And so I did :)

I made two different kinds.  The first batch, I made with my boys in mind.  I figure my oldest can take some to school for Valentine's Day since they did not take any time at all. Here are some of them:


Aren't they cute?!  I used the Pink Journey cartridge.  I cut the butterfly and shadow at 4.5.  I glued the two pieces together and I had some fun looking butterfly treats for Valentine's Day.  I cut the heart at 1.25.  I stamped the hearts with different sentiments. They kind of remind me the candy hearts I used to pop in my mouth as a little girl.

I wrapped the lollipops with crepe paper and wrapped some baker's twine around them.  Honestly, I didn't use any fancy crepe paper.  I used crepe paper left over from party streamers - waste not, want not!

Make sure to trim the bottom of the crepe paper.  If you don't, the lollipops look like colorful ghosts.

I made 4 incisions that were about .75 inches.


You don't have to be super precise
with the incisions.
Put the stick through like so.


I attached the little hearts to them and that's it!  They are ready for some yummy Valentine's gift giving.


The great thing about these Valentine Butterfly pops is that you can gussy them up.  I made this one for my hubby:


The butterfly cut is from the Hannah Montana.  I cut it at 4 inches.


I spritzed the shadow with some gold mist and it left spots.
It didn't matter, though, because most of it is covered by
the pattern paper.


I trimmed off the head and tail of the butterfly on the pattern paper.


I used a smaller lollipop, which I ended up liking better.  (Smaller = A lot less sugar.  Oh well, Valentine was meant to be sweet!) I wanted to cover it in brown tissue but I didn't have any.  So I did what any crafty girl would do - made my own.  I sprayed so much color on this tissue it had no choice but to change.  To speed up the drying process, I used a heat tool.


Before
After :)

I wrapped some brown twine around it for an elegant but rustic look.  The heart is from Pink Journey is cut a 1.25.  I spritzed it to give it some shine.


I hope you enjoyed your stop here.  In honor of Valentine's Day, I am offering a giveaway.  Please leave a comment to enter for chance to win a "Cross My Heart" embossing folder and border.  Make sure you leave a way I can contact you via email.  I will announce a winner on Monday :)

Last, but certainly not least is the lovely Scrapalette.  Check out her Valentine's Day project at Around the Block with Scrapalette.  She always has such great ideas!

Here is the entire blog list:

1. RockinRenee - I came, I saw, I created.
2. HappyScrapper64 - Random Thoughts of a Scrapbooker
3. gonescrappin - Col's Creative Corner 
4. Hrvatica  - Croatian Crafter
5. Scootingranny - Scootingranny's World
6. MamaC - Carolyn's Creative Corner
7. Greenie8705 - Gina Beana's Crafts
8. MariaJ - Stamp, Cut, Create!
9. Di&Co - Creating Is Like Breathing
10. Dragonfly50 - Designs by Dragonfly
11. TiffysMom - Angie's Paper Passion
12. *Violette* - Whimsical Treasures
13. cricutaddicted - ScrappingForMoreFun
14. LoriSjogren - The Singing Shell  <------ You Are Here
15. Scrapalette - Around the Block with Scrapalette <------ Go Here Next


Materials & Supplies for fun butterflies

Cricut cartridges: Pink Journey
Cardstock: Martha Stewart
Stamps: Papertrey Ink Mini Mega Messages
Crepe paper: party streamers
Baker's twine from my stash
Lollipops: Blow Pops

Materials & Supplies for elegant butterflies

Cricut cartridges: Hannah Montana, Pink Journey
Paper for elegant butterflies: DCWV, Co'redinations
Stamps: Papertrey Ink Mini Mega Messages
Color Spray: Gold Doubloons from Lindy's Stamp Gang, Espresso Color Wash from Ranger
Twine: Tori Spelling
Lollipop: Dum Dums


Saturday, January 25, 2014

Papertrey January Blog Hop

I couldn't resist the Papertrey Ink Blog Hop this month. It is called Pretty in Pink and, with Valentine's around the corner, it is a perfect theme.

I pulled out my Simply Jane stamp set & dies and some Soft Stone, Sweet Blush, and Hibiscus Burst paper .  This what I came up with:


I drew in some grass at the bottom of the frame and used Meadow Greens for the "tree" in the background because I pictured Mr. Darcy and Elizabeth out for a walk like in that last scene of the movie version of Pride and Prejudice. "You have bewitched me, body and soul..." Swoon!

I embossed the frame with the Woodgrain Impression Plate. Some Perfect Pearls in Pewter was dusted lightly on the frame give a little contrast.  I added some ribbon, a flower, and a doily. I added Clear Rock Candy Dry Stickles to the figures so they would stand out but still show the Hibiscus Burst color of the paper.


Die-cut leaf is from Meadow Greens

All products are from Papertrey Ink except: Perfect Pearls, Stickles, ribbon, flower and doily.

I made a second card (not part of the Blog Hop but thought I'd share) because I just could not stop using the stamp set:


Friday, October 25, 2013

Papertrey Ink Blog Hop - Tags


I made these Christmas tags for the Papertrey Ink Blog Hop  which calls for making at least 5 tags.  I used some very nontraditional colors - dark gray, black and pearly white.  To make my tags, I used Smokey Shadow cardstock and my new favorite stamp set, Meadow Greens. I think it is very versatile - not just for spring.  "Peace" and the leaf are both from that set.  I cut out the tags using the biggest die from the Angled Labels Die Collection.

I embossed the leaf with a glittery embossing powder called Starry Night.  It was so glittery, the darn thing was hard to photograph.  I must have taken 20 pics before I got something that wasn't a blob of sparkle. Lol.

I used Perfect Pearls for the sentiment.  I think that made it pop out despite the sparkle on the leaf.  The ribbon is from American Crafts.

Thank you for looking!


Look at the glitter!

Monday, February 25, 2013

Pretty in Pink Monogram Card


This is a monogram card I made for the Papertrey Ink Blog Hop which is featuring monograms. This is the first time I have participated so I am pretty excited to see how this works out.

For the monogram and frame, I broke out my Slice and the Grandama's Attic desgin card.

The sentiment and accents are from the Simply Jane stamp collection by Papertrey Ink.  The card and the tag are made with Sweet Blush cardstock also from Papertrey Ink.

The monogram, frame and map cardstock are from Promise Me by SEI.  I inked the edges of the map cardstock with Mix'd Media Inx in Chiffon which cooridinated pretty well with the Sweet Blush cardstock

Monday, February 11, 2013

A Rustic Valentine


This is a card that I made for a Valentine's Day swap.  I used white cardstock from Recollections and inked the edges with Antique Linen. The sentiment is from the Tiny Wishes set from Stampin Up.

I ran the kraft paper (PTI) through my Cuttlebug with a cool folder from Stampin Up called Square Lattice.  I saw my demonstrator use it on one of her cards and I had to have it, of course.  I think it made the kraft paper look like burlap, which was a really nice effect.  I am going to use it again like this.

The frame is from the Holiday Frames & Tags Cricut cartridge.  The pretty pink paper is also from Stampin Up.  I laced through some sheer ribbon and stamped an image of Mr. Darcy and Elizabeth.  The stamp is from the Jane Austen collection from Papertrey Ink.  I love this stamp set.  Pride and Prejudice reminds me of my wonderful hubby.

I am entering this card in the Fantabulous (gotta love that word:) Cricut Challenge Blog.  Be My Valentine.


It is a truth universally acknowledged, that a single man in possession of a good fortune, must be in want of a wife.
Jane Austen, Pride and Prejudice, 1811

Sunday, May 6, 2012

A Peter Rabbit Mother's Day


I made another Mother's Day card for my mom.  Ever since I saw this stamp, I have been wanting to use it for this very purpose.  I reminds me of my son and my mom :)  She will love it I think especially since it will be from her grandson.  Would you believe the stamp is from Peter Rabbit: Winter Wishes, a Christmas set?  It is such a great image you can use is for anything.  The "Mother" sentiment is from Papertrey Ink.

I loved the colors in the Shabby Tea Room Blog.  It is one of my favorite color combinations because it is so pretty and feminine.  If I ever have a girl, her room would be these colors.  The challenge also called for flowers which is in the pattern paper and polk dots.  I made a flower using ribbon which I learned in a class by Melissa Frances. The green floral pattern paper and pink pattern paper is Pink Paisley and the green polka dot paper is from Graphic 45.  The blue cardstock is from Bazille.

I cut the circle and scalloped circle using the Sugar and Spice Cricut cartridge by Provocraft. 
I used Tim Holtz Distress Markers and Detail Brush to to color Peter Rabbit and his mom.  I used: Stormy Sky, Weathered Wood, Tea Dye, Vintage Photo, and Milled Lavender.  I inked the edges with Victorian Velvet and Antique Linen.

I can't wait to give it to my mom!

I also entered:
2 Sisters Challenge Blog  - #90 Anything Goes
Sweet Stampin Challenge Blog - 4 Legged Friends - my little rabbits
Simon Say Stamp and Show - Kaleidoscope of Color - I have pinks, greens, blues, browns, lavender, gray and white.  It's amazing how well they all work together :)
Crafts and Me Challenges - favorite color combos - pink and green
Paper Sundaes - Mother's Day, Challenge 119
Dream Valley - Challenge 31, For a Special Lady
Little Miss Muffet Challenges - May Flowers, Challenge 34
Creative Crafts Challenges2 - Anythings Goes

Friday, April 20, 2012

Vintage Mother's Day Card


I started making this card for a color challenge but I saw another one with vintage.  Blues and vintage... LOVE it! :)

The color imspiration came from: I Came, I Saw, I Created
The vintage inspiration came from: Crafts and Me, Challenge #80: Vintage

I also entered:
2 Sisters Challenge Blog - Flowers
Great Impressions Stamps - Lots of Flowers
Sweet Stampin Challenge Blog - Girly, but no pink
Simon Says Stamp and Show - Anything goes


I Used:
- Elegant Edges Cricut Cartridge, Provocraft - hearts2 + book feature at 3.6 in
   and hearts2 + book feature + shift at 3.6 in
- Vintage Papers Imagine Colors & Patterns Cartridge - second image on page 2.  I flooded the light blue cardstock with this iamge.
- Hydrangea stamp, Three Birds Estate Collection
- Perfect Pearls powder, Ranger
- Cream Pearl Pen, Viva Decor
- "Celebrate Today" sentiment - Papertrey Ink
- Fabric flowers from my stash
- All cardstock from Stampin' Up


I added Perfect Pearls powder to the hydrangea.
You can also see how the Imagine Printed on the light blue paper... Cool, huh?


The Viva Pearls were added by hand... after lots of practice!


Friday, March 23, 2012

Elegant Thank You


I made this card with Renee's Color Challenge in mind at I Came, I Saw, I Created.  I liked it so much I used the design for a card swap in the Cricut Circle.  I used dark brown gosgrain ribbon I got from the Dollar Tree.  I had no idea they had ribbon.  Good quality stuff, too! 

I used the frame from Simply Jane by Papertrey Ink.  The pink cardstock and sentiment is also from Papertrey Ink  - Mega Mixed Messages.  Can I tell you?  That stamp set has just about any sentiment you need. The yellow cardstock is from Bazille.  The tan pattern paper is from Melissa Frances.  The off white cardstock is from my stash.

I used Pop Dots to raise the frame and edged it with Antique Linen Distress Ink.


Here is a pic of the other card I made fore the swap:


Hem your blessings with thankfulness so they don't unravel.~ Author Unknown


Sunday, March 18, 2012

For You, Your Majesty


I made this card for my dad who is ruler of all he surveys... ;)  This was a fun card to make and I used a crown and the color from challenges in the Cricut Circle Message Board. 

I Used:
- Baby Boutique Imagine Art Cartridge, 3rd icon on p. 33
- Crafty Secrets - Greetings from Wonderland stamp set
- Close to My Heart - "For You" sentiment - Card Word Puzzle stamp set - WOW! There are a lot of words you can mix and match in this set
- Cuttlebug - Musical Flourish folder
- Papertrey Ink - Kraft paper & white cardstock
- Seam binding from my own stash
- Tsukineko - Timber Brown Staz-On ink pad
- Ranger - Tim Holtz  - Distress Ink Pad - Victorian Velvet
- Ranger - Perfect Pearls
- Bazille - Red cardstock
- PrismaColor Pencils and Reeves Color Pencils
- Gamsol for Blending

Here's How:
I stamped the image on white cardstock in Timber Brown, a nice dark, espresso.  I colored the image using the color pencils and used the Gamsol to blend.  I used Victorian Velvet with the blending tool to ink the edges softly.


I cut the crown at 2.5 inches and added Perfect Pearls to make it sparkle.  Afterall, it is a crown. ;)


I dry embossed the kraft paper with Musical Flourish. 

I attached the seam binding on the side of the kraft paper and realized that I did not want white.  I had already added glue I decided to use Victorian Velvet with the blending tool.  A happy accident happened.  The ribbon picked up the embossing on the kraft paper.  How cool!!  I am going to do it on purpose from now on. I stamped "FOR YOU" on the seam binding.


"OFF WITH HER HEAD!"
Queen of Hearts, Alice in Wonderland
~Lewis Carroll

Monday, February 6, 2012

I Love You Ardently Card


The fog finally lifted for me.  I made a Valentine's Day card for my husband that I am happy with.  I had stumbled across a post in Cricut Circle by Sara Andrews.  She had made a giftbag using the Teresa Collins Balck and White cartridge and I remembered: Hey, I have a bunch of color and pattern cartridges I can use!  So I pulled out on of my favorites: Audrey.  I even love the name - it reminds me of Audrey Hepburn. 

I Used:
- Cricut Imagine for the frames (part of the shapes that come with the Imagine) and printing the red damask background on the frame
- Audrey Color and Pattern Cartridge - red damask paper
- Microglaze to protect the ink on the printed paper
- Papertrey Ink - Simply Jane sentiment and Linen Impression plate
- Ranger Ginger Alcohol Ink
- Seam Binding
- Tattered Angels - Marshmallow Mist
-  Heart charm from my stash


The MicroGlaze helps protect the paper printed using a jetink printer.  It doesn't smear and a little goes a long way.


You can't see and I don't know how to photograph it but there are little tiny sparkles from the Marshmallow Mist.  I like it because it is subtle.


I puntured a hole on the bottom of the red damask frame and added the heart charm.  You can also see the debossing impression of the Linen Impression Plate.


I love thee with the breath,
Smiles, tears, of all my life! --- and, if God choose,

I shall but love thee better after death.
- Elizabeth Barrett Browning, How Do I Love Thee?

Saturday, February 4, 2012

Shabby Chic Birthday Card


Well, I wasn't supposed to but I bought the Simply Jane collection from Papertrey Ink.  I couldn't resist.  Just about anything Jane Austen calls my name and it is hard to say no.  The Simply Jane collection includes the stamps (with Austen quotes!), matching die-cuts for the stamps and cardstock with pages from her novels.  Swoon! :)

I used the cameo and frame die-cuts.  The paper in the background in is Melissa Frances.  I can't bring myself to use the Simpy Jane cardstock yet.  I'll get over that soon. ;)

I used Martha Stewart Doily Lace Edge Punch for the beige ribbon of paper that goes across the card.  The sentiment is from Simply Jane.


The most complicated thing - but worthwhile - was dyeing the seam binding.  I used equal parts Close to My Heart Soft Pink Re-Ink and Ranger Red Pepper Alcohol Ink with lots of water.  I am really pleased with the different hues of soft pink that developed so I will definitely use that combination again :)  The kraft colored button is also from Papertrey Ink and I sewed that onto the ribbon.


“There is nothing I would not do for those who are really my friends. I have no notion of loving people by halves, it is not my nature.” ~ Jane Austen, Northanger Abbey